Automated Drift Monitoring
In a production scenario where models are deployed and serving predictions, it is important to monitor the model’s performance and the data it is receiving. omega-ml provides a way to automate this monitoring process by attaching a DriftMonitor object to a model, and scheduling it to run at regular intervals.
Setting up a model
Whether a model is monitored automatically or manually, it must first be put into the omega-ml model store. This is the same as for any other model. In this example, we use a scikit-learn LinearRegression model to predict housing prices, using the California Housing dataset provided by scikit-learn.
# create a basic model
from sklearn.linear_model import LinearRegression
from sklearn.datasets import fetch_california_housing

california = fetch_california_housing(as_frame=True)
reg = LinearRegression()
reg.fit(california.data, california.target)
om.models.put(reg, 'california')
Attaching a monitor to a model
Once a model is stored, we can attach a DriftMonitor to the model, and schedule it to run daily.
# setup the drift monitor
with om.runtime.experiment('housing', autotrack=True) as exp:
    exp.track('california', monitor=True, schedule='daily')
The DriftMonitor will take snapshots of the input and target features of the model, and compare them to a baseline snapshot. If the distribution of the features has changed significantly, the DriftMonitor will raise an alert.
Upon calling exp.track(…, monitor=True), a new job is created that will run the DriftMonitor at the specified schedule. The job will run the DriftMonitor’s capture() method, which takes a snapshot of the model’s input and target features, and compares them to the baseline snapshot. If drift is detected, the DriftMonitor will raise an alert.
Note
The monitoring job is created as follows and stored in om.jobs and named as monitors/{experiment}/{model}. In this case, the job is named monitors/housing/california. The job can be started, stopped, and monitored like any other job. The job’s code can be changed or extended as needed, for example to add additional steps or to send send a custom message to a third-party application.
# configure
import omegaml as om
# -- the name of the experiment
experiment = '{experiment}'
# -- the name of the model
name = '{meta.name}'
# -- the name of the monitoring provider
provider = '{provider}'
# -- the alert rules
alerts = {alerts}
# snapshot recent state and capture drift
with om.runtime.model(name).experiment(experiment) as exp:
    mon = exp.as_monitor(name, store=om.models, provider=provider)
    mon.snapshot(since='last', ignore_empty=True)
    mon.capture(rules=alerts, since='last')
Creating a baseline snapshot
First, let’s create a baseline snapshot of the model’s input and target features.
with om.runtime.experiment('housing', autotrack=True) as exp:
    mon = exp.as_monitor('california')
    mon.snapshot('california', X=california.data, Y=california.target)
Let’s say the model has been running for a few days, and we want to check if there is a concept or model drift, that is P(Y|X) has changed.
Run predictions
Now, let’s simulate a change in the target predictions, relative to the input features. We can do this by simulating a number of predictions, however using only a fraction of the input.
model = om.runtime.model('california')
yhat = model.predict(california.data.sample(frac=0.1)
Since we have defined the experiment to be autotracking, the predict() method’s input (X) and output (Y) are automatically logged. To investigate, we can check the experiment’s data as follows:
exp.data(event='predict', run=-1)

Examine model drift
The DriftMonitor will regularily take snapshots of all predictions the current snapshot to the baseline snapshot, and log an alert. For illustration, let’s do this manually.
mon.capture() # take a snapshot of the most recent predictions
exp.data(event=['drift', 'alert'], run=-1)

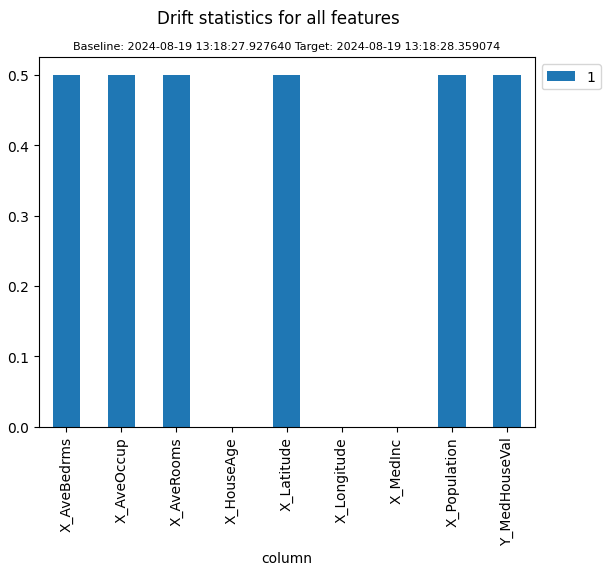
The alert indicates that the target predictions have changed significantly relative to the input features. To see this, we can get back the alert’s data and plot the drift statistics. These are the same DriftStatistics that mon.compare() returns.
stats = mon.events('alert', run=-1)
stats.plot()

How model predictions are auto-tracked
When a model is autotracked, omega-ml’s tracking system will automatically log the input (X) and output (Y) of the model’s predict() method. This is done by intercepting the model’s predict() method and logging the data to the attached experiment. The requirement is that the predict() method is called via omega-ml’s runtime, i.e. either using the REST API or by calling om.runtime.model(‘california’).predict(X).
For example, when we call model.predict(X), the input (X) and output (Y) are logged to the experiment’s data store. The data is logged with the event name predict and the run number incremented by one.
model = om.runtime.model('california')
yhat = model.predict(california.data)
exp.data(event='predict', run=-1)

Upon calling mon.snapshot(), the DriftMonitor will take a snapshot of the most recent predictions by querying the tracking system for the most recent data with the event name predict. The most recent data is assumed to be all data logged since the last snapshot was taken. Alternatively, we can use the since= parameter to specify a different time range.
mon.snapshot() # take a snapshot of the most recent predictions, this is the same as specifying `since='last'`
mon.snapshot(since='<datetime>`) # take a snapshot of the predictions since a specific datetime
Manually capture a model’s predictions
In cases where we want to manually capture a model’s predictions, we can do so by calling the snapshot() method and specifying the input (X) and output (Y) data. In this case, instead of querying the tracking system for the most recent data, we provide the data directly.
california_noisy = california.data + 0.1 * np.random.randn(*california.data.shape)
with om.runtime.experiment('housing', autotrack=True) as exp:
    mon = exp.as_monitor('california')
    mon.snapshot('california', X=california_noisy, Y=california.target)
    mon.capture()
By subsequently calling the capture() method, this latest snapshot is compared to the previous one, and any drift event and alert is recorded the same way as the automatic monitoring job would. This is useful when we want to take a snapshot of a specific set of predictions, e.g. to simulate a change in the model’s predictions for testing purpose.